After stepping away from Stable Diffusion for about five months I came back to it only to find a mess of my system. Things were all out of sync, packages were outdated and upgrading made it worse. I had multiple versions of Python conflicting with each other etc. Not to mention all the various venv's peppered throughout it all. Previously, my Stable Diffusion PC was running Manjaro, but this time I decided to go the "easy" route and set everything up from scratch on Ubuntu.
Just gonna get this out now, I'm not a fan of Ubuntu. I use Ubuntu Server for my LXC containers in Proxmox, but not much else. And I've never had any interest in running a DE on it, especially Gnome. Buuuuut those are just my opinions and apparently a lot of people really like it and that's why there's a ton of support/resources for it. So that's what made me decide to go with it for this.
For this setup I'm using:
- AMD Ryzen 5700x
- 1TB SSD
- 64GB DDR4 RAM
- Nvidia GeForce RTX 3060 TI (8GB)
I'm not going through the steps for installing Ubuntu, but basically:
- Download Ubuntu Desktop
- Flash it to the SSD with Balena Etcher
- Put the SSD in the computer and turn it on
- Go through the setup, connect WiFi etc
The steps below begin with a clean install of Ubuntu 22.04.2 LTS
Update the system
sudo apt update && sudo apt upgrade
Install/Setup Timeshift
This step is optional, but it was good to do because I messed this up several times and being able to restore from a snapshot was very nice.
sudo apt install timeshift
Timeshift settings:
- Type: RSYNC
- Location: Main SSD
- Schedule: None
- Users: "Include All Files" for /home/pywkt
- Filters: Default
- Misc: Default
Create backup with Timeshift
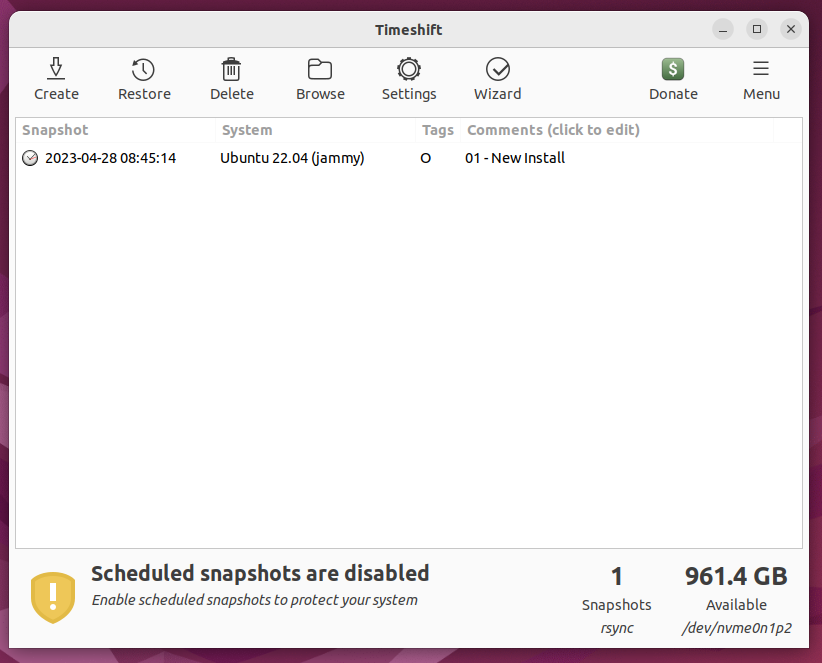
On my first attempt at doing this I tried to restore from a backup and something got super messed up and I had to reinstall Ubuntu. I was thinking it was because I was saving/restoring from a backup that was on the same HDD. Not sure if that's what caused the issue, but just to be safe, after each backup I'm manually sending them to a folder on my NextCloud server.
Restart
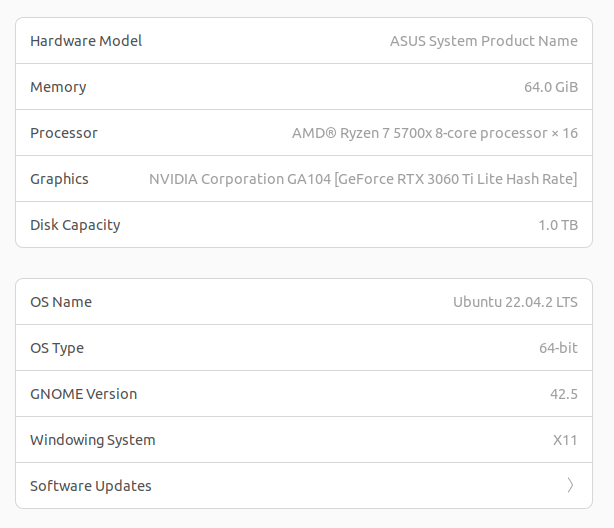
Install Nvidia Drivers
- Open up the Ubuntu Settings and select the About tab
- Click Software Updates to open a new window
- On the Additional Drivers tab, select the one with the highest number
- Click Apply Changes
- Restart
Before Nvidia drivers:
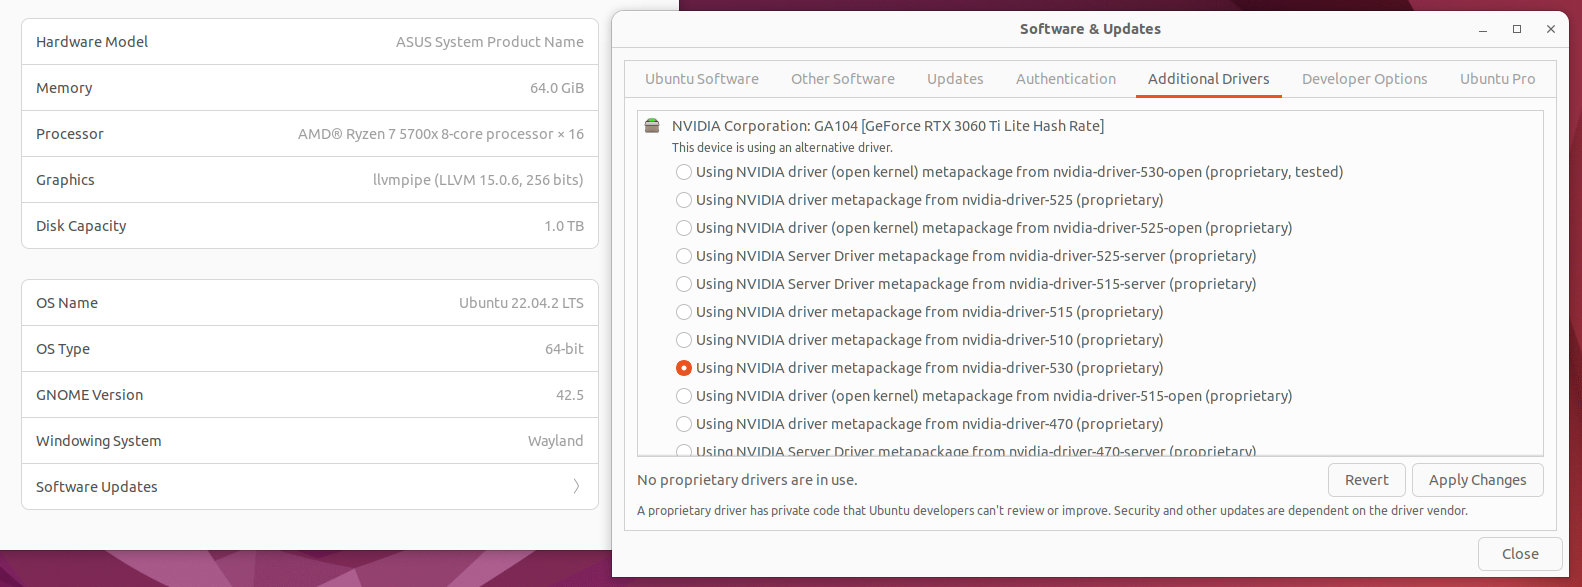
After Nvidia drivers:
Backup with Timeshift
Install ZSH and others
Again, optional, but why would we want to bother with Bash when we can ZSH?
sudo apt install build-essential curl file git
sudo apt install git-core curl fonts-powerline
sh -c "$(wget https://raw.github.com/ohmyzsh/ohmyzsh/master/tools/install.sh -O -)"
Logout and log back in for the changes to take effect.
Backup with Timeshift
Setup Tensorflow
Install Miniconda
cd ~/Downloads
curl https://repo.anaconda.com/miniconda/Miniconda3-latest-Linux-x86_64.sh -o Miniconda3-latest-Linux-x86_64.sh
chmod +x Miniconda3-latest-Linux-x86_64.sh
./Miniconda3-latest-Linux-x86_64.sh
Press Enter a few times to confirm the TOS and default options. Close the terminal and open it back up. If you entered 'yes' for the last question, when you start the terminal you should see (base) on your terminal line.
Setup a new environment for Tensorflow
conda deactivate
conda create --name tf python=3.10
conda activate tf
Install CUDA and cuDNN
conda install -c conda-forge cudatoolkit=11.8.0
pip install nvidia-cudnn-cu11==8.6.0.163
Configure system paths when starting tf environment
mkdir -p $CONDA_PREFIX/etc/conda/activate.d
echo 'CUDNN_PATH=$(dirname $(python -c "import nvidia.cudnn;print(nvidia.cudnn.__file__)"))' >> $CONDA_PREFIX/etc/conda/activate.d/env_vars.sh
echo 'export LD_LIBRARY_PATH=$LD_LIBRARY_PATH:$CONDA_PREFIX/lib/:$CUDNN_PATH/lib' >> $CONDA_PREFIX/etc/conda/activate.d/env_vars.sh
conda deactivate
conda activate tf
Install TensorFlow
pip install --upgrade pip
pip install tensorflow==2.12.*
Verify CPU
python3 -c "import tensorflow as tf; print(tf.reduce_sum(tf.random.normal([1000, 1000])))"
Verify GPU
python3 -c "import tensorflow as tf; print(tf.config.list_physical_devices('GPU'))"
To be totally honest, I'm not even sure if this is what I should expect to be seeing, but I'm getting this:
CPU:
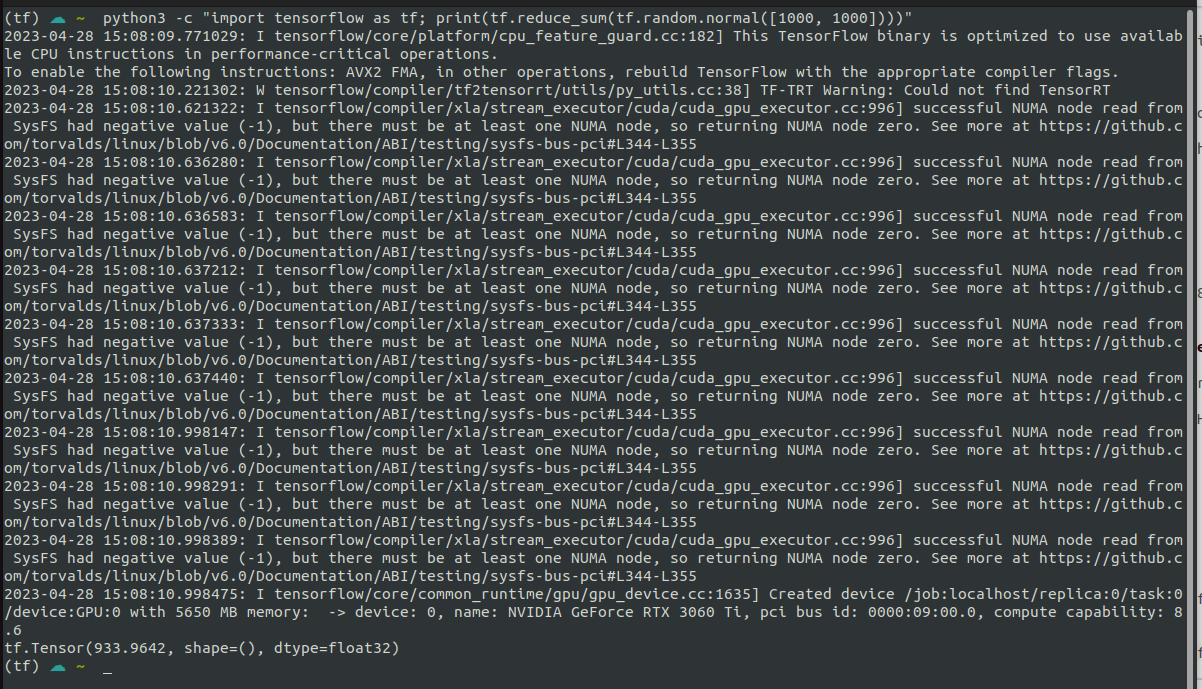
GPU:

Based on the fact that all of the messages (except one) have the I at the beginning I think this is ok, but the one W has me wondering. I'm going to create another backup and try to install tensorRT with pip.
Backup with TimeShift
Install TensorRT
pip install tensorrt
After running this it seems like it's downloading nvidia-x-x12 (instead of 11 like I did above). I might have just been able to do this from the start to get everything I needed, but either way, this seems to work.
Running the CPU/GPU commands from above seems to output the same result.
Moving on...
Setup kohya_ss
Clone the kohya_ss repository
mkdir ~/stable_diffusioncd ~/stable_diffusiongit clone https://github.com/bmaltais/kohya_ss.gitcd kohya_sssudo apt install python3.10-venvsudo ./setup.sh./gui.sh
Open a web browser and go to 127.0.0.1:7860 and you should see the gui.
Prepare training images
Install Gimp
sudo apt install gimp
Resize images
I have a folder of about 18 images of the person I want to train a LoRa model on. I opened up each one in Gimp, resized each one so that the smallest side was 512px and then cropped them to 512x512 and saved them in a new folder
Caption images
In the kohya_ss web ui, go to the Utilities tab and then the BLIP Captioning tab inside that. Put in the directory of the images you just resized and click the Caption Images button. It should create one text file for each image in the folder of images we just resized. Go through each text file and replace the subject with the keyword you're going to use for the training. Mine is jbov so instead of a file that says:
a man with glasses and a beard sitting in front of a brick wall
It now says:
jbov with glasses and a beard sitting in front of a brick wall
Create folder structure
Set up a folder structure that looks something like this. My subject is jbov so make sure to rename that to whatever your subject is called.
- /home/pywkt
  - jbov
    - model
    - log
    - image
      - 100_jbov
        - 001.jpg
        - 002.jpg
        - ...
Put the cropped/resized images and text files in the 100_jbov folder.
Download these two files: LoraBasicSettings and LoraLowSettings.
Place them in the kohya_ss folder.
Note: These files are just modified versions of the ones in Aitrepreneur's video description.
Configure training
Start the kohya_ss gui and open it up in a browser Click the Dreambooth LoRa tab Expand the Configuration file dropdown Click Open and select one of the two json files from above Click the Load button. (not sure if this is necessary, but I do it anyway) On the Source Model tab, select the model to train against

Select the Folders tab and set the Image, Output and Logging folders to the ones created earlier.
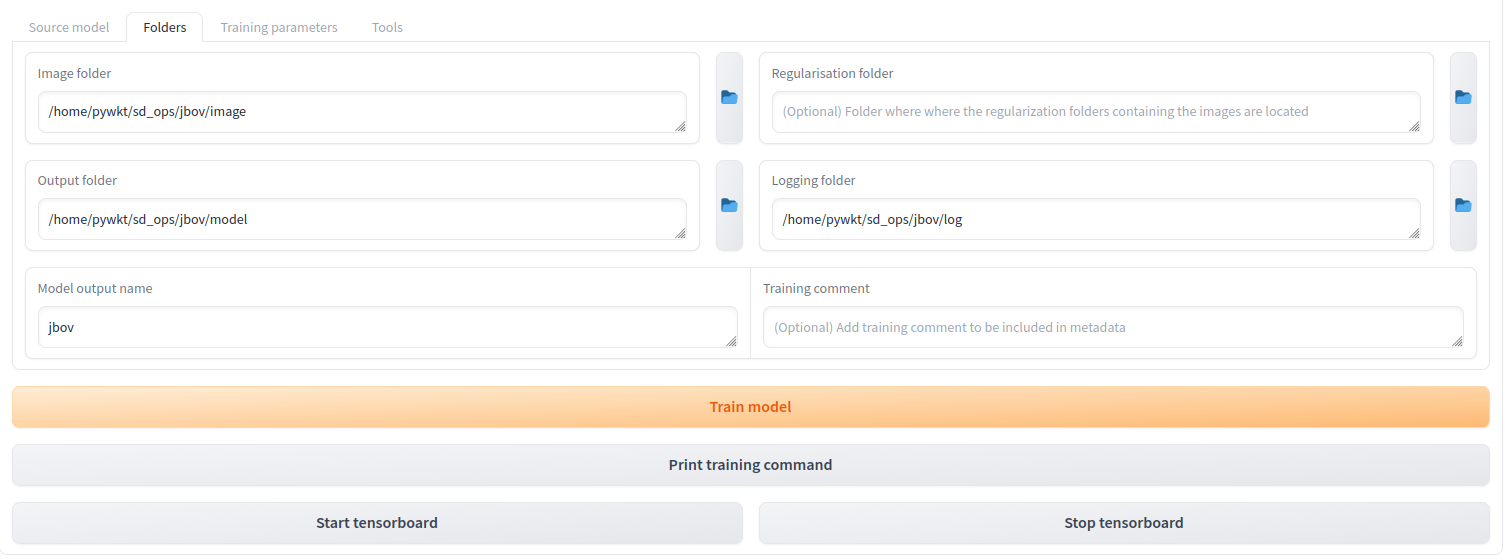
Note: For the Image path, choose the image folder, not the actual 100_jbov folder that has all the images.
Click the Train Model button at the bottom. If everything went as it should, the training should start with no issues.
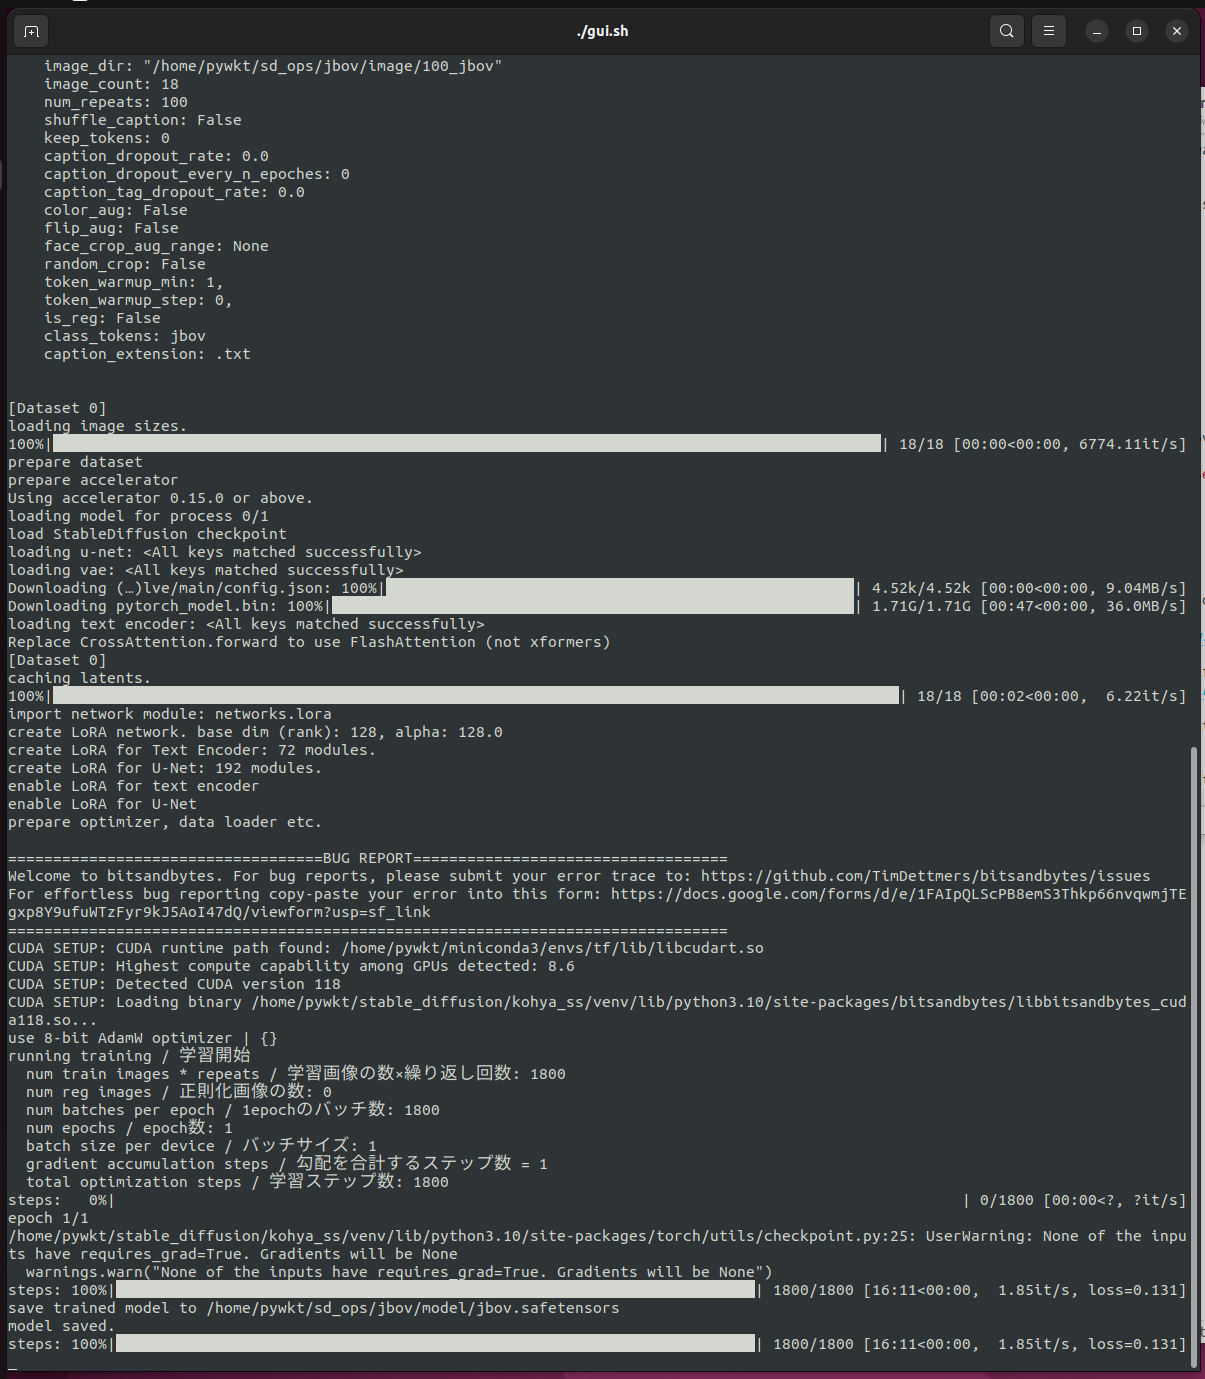
Once it's done there should be a jbov.safetensors file in the model folder that we created
Backup with Timeshift
Stable Diffusion WebUI
I was debating trying out the vladmandic fork of automatic1111's web ui, but for now I think I'm just sticking with what I know. So auto1111 it is...
Set up automatic1111
git clone https://github.com/AUTOMATIC1111/stable-diffusion-webui.git
cd stable-diffusion-webui
Copy/paste the v1-5-pruned-emaonly.ckpt file in to stable-diffusion-webui/models/Stable-diffusion
Open the webui-user.sh file, uncomment line 13 and change it to:
export COMMANDLINE_ARGS="--xformers"
I'll probably be adding more params to that, but for now we'll try this out
Note: I'm not sure it matters at all, but I'm still in the tf venv.
./webui.sh
I ran in to an error where open_clip and packages related to that weren't installing correctly/just timing out. To solve this I changed the permissions on my /tmp folder and ran the webui.sh script again. Once it installed I just switched the permissions back to root. The next three steps explain how to solve that.
Allow current user to use it: sudo chown pywkt:pywkt /tmp (replace with your username/group)
Start the web-ui/install everything: ./webui.sh
Set permissions back to root: sudo chown root:root /tmp
Once it's all done installing everything, the ui should be available at 127.0.0.1:7860
Backup with TimeShift
Everything should be all set up and Automatic1111's web ui should be working with the LoRa models we create with the kohya_ss gui.