This is just a quick guide on how to set up a ProtonVPN connection with a kill-switch on Arch Linux. Proton does have a GUI app, but Arch isn't officially supported. The Proton CLI app used to be a safe bet, but it seems that is basically gone. So, since Proton offers the WireGuard configs for their servers, it seems like just running the VPN with raw WireGuard might be the way to go.
There are also steps to run the VPN via NetworkManager near the bottom of the post.
Create/download the VPN config
Log in to your VPN account at https://account.protonvpn.com
Click the WireGuard tab in the menu on the left of the page
Give the certificate a name.
I like to scroll down, find the server I want to connect to and then scroll back up and name my config the name of the server.
Select GNU/Linux
You can pick what options you want, but I usually just choose "Block malware only" and "VPN Accelerator"
Scroll down and select the server you want to connect to and click the Create button in the row.
Once the config is generated, click the Download button and save it to your computer.
Make sure the name of your config is under 15 characters
Starting WireGuard (cli)
Install Wireguard
sudo pacman -S wireguard-tools
Copy the config you just downloaded to /etc/wireguard
sudo cp <wireguard-config>.conf /etc/wireguard
Start WireGuard with the config. Do not include the .conf part, just the name of the config
sudo wg-quick up <wireguard-config>
If everything worked you should be able to run sudo wg and see that you're connected
❯ sudo wg
interface: US-CA-14
  public key: <key-will-be-here>
  private key: (hidden)
  listening port: 45434
  fwmark: 0xab0fd

peer: Rtsl6k9WA9t04Vt+EDAB3TlIr1YL2YcTF+wiBD9qBwA=
  endpoint: 123.40.54.6:51820
  allowed ips: 0.0.0.0/0
  latest handshake: 26 seconds ago
  transfer: 445.12 KiB received, 442.83 KiB sent
If you go to https://ipleak.net you should now see the IP of the server you're connected to.
To stop WireGuard run
sudo wg-quick down <wireguard-config>
Setting up the kill-switch
Stop WireGuard with the command above and open up you config file in a text editor.
Add the following lines after the [Interface] section
# Killswitch, prevent all interfaces except wg
PostUp  =  iptables -I OUTPUT ! -o %i -m mark ! --mark $(wg show %i fwmark) -m addrtype ! --dst-type LOCAL -j REJECT && ip6tables -I OUTPUT ! -o %i -m mark ! --mark $(wg show %i fwmark) -m addrtype ! --dst-type LOCAL -j REJECT
PreDown = iptables -D OUTPUT ! -o %i -m mark ! --mark $(wg show  %i fwmark) -m addrtype ! --dst-type LOCAL -j REJECT && ip6tables -D OUTPUT ! -o %i -m mark ! --mark $(wg show  %i fwmark) -m addrtype ! --dst-type LOCAL -j REJECT
This basically just says, don't allow anything through unless it's from WireGuard, but here's a breakdown:
iptables -I OUTPUT- Insert a rule into the OUTPUT chain (outgoing traffic)! -o %i- NOT going out through the WireGuard interface (%i = interface name)-m mark ! --mark $(wg show %i fwmark)- NOT marked with WireGuard's firewall mark-m addrtype ! --dst-type LOCAL- NOT destined for local addresses (localhost, LAN)-j REJECT- Block the traffic
Then the same commands are repeated for IPv6
Save the file and copy it to /etc/wireguard
sudo cp <wireguard-config-ks>.conf /etc/wireguard
Now you can run the same command as above to start the WireGuard tunnel and there should be a kill-switch enabled
sudo wg-quick up <wireguard-config-ks>
If you want to run this config when the system boots you can use WireGuard's built in systemd integration
Start at boot
sudo systemctl enable wg-quick@<wireguard-config>.service
This will automatically create a service that runs wg-quick up <wireguard-config> at boot
Starting WireGuard (NetworkManager)
This is just another method of doing the steps above, but with the NetworkManager GUI. If you followed the steps above and got everything running, this is not required, but if you want to continue, stop the WireGuard connection before proceeding.
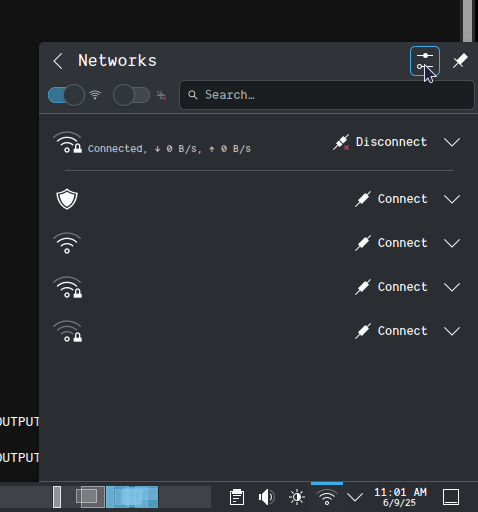
Open NetworkManager by clicking the config icon in the WiFi menu in the taskbar.
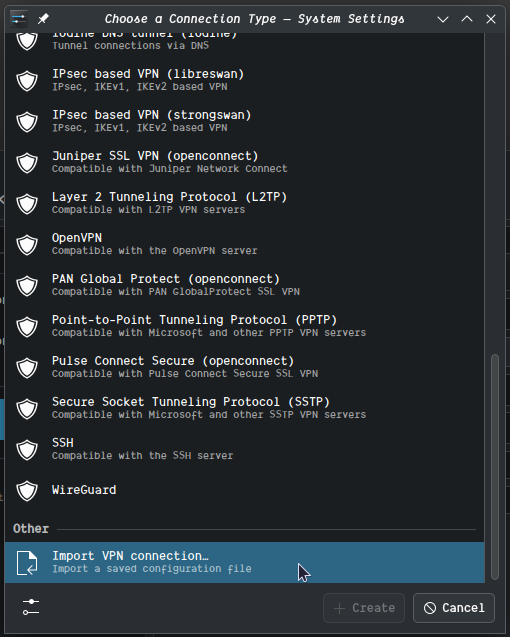
Click the "Add new connection" (+) button and select "Import VPN connection" from the list
Select the WireGuard config and it should automatically connect
...thaaat's about it 🤷
References:
https://protonvpn.com/support/wireguard-linux https://www.rvrx.dev/blog/wireguard-kill-switch/